Drawing real-looking water is very hard. I still remember sitting outside with my sketchbook, with pencil marks all over my fingers. I could not figure out why my pond drawing looked like a dry hole instead of wet water. The problem is that water is not a solid thing. It is always moving. It acts like a mirror for the sky, but it also hides dark shadows underneath.
My early water sketches just looked like empty ditches. I ruined a lot of paper before I finally figured out how to do it right. But once you learn this simple trick, your nature drawings will improve fast.
Quick Ideas: Pond Drawing Examples
Before we jump into the steps, it helps to look at a few examples. There is no single “right” way to draw a pond.
- Caption: A highly detailed pencil sketch with dark shadows.
- Caption: An easy, cartoon-style pond with thick lines.
- Caption: A koi pond drawn from above so you can see the fish.
For this tutorial, I am going to focus on the realistic style. I will show you the exact pencils I use to make the water look wet. I learned this the hard way after years of bad drawings, but the actual steps are pretty simple.
What You Need for This Drawing
Before we start, here is a quick list of the tools you need and how long this drawing will take.
| Item | Details |
| Time Needed | 45 to 60 Minutes |
| Experience Level | Beginner to Intermediate |
| Paper | A4 Sketchbook (paper with a little texture) |
| Main Pencil | HB |
| Detail Pencil | 2H |
| Dark Pencil | 4B |
| Eraser | Kneaded Eraser |
| Blending Tool | Paper Blending Stump |
My Basic Drawing Tools
I don’t use fancy or expensive art supplies. My desk setup is actually very simple. Here is exactly what I use to make my water sketches look real:
| Tool | Why I Use It |
| HB Pencil | The first sketch: I grab this first to outline the shore and place my rocks. |
| 2H Pencil | Light lines: The lead is hard, so it doesn’t smudge. It works great for far-away trees and tiny ripples. |
| 4B Pencil | Dark shadows: This one is soft and dark. I use it to shade the deepest parts of the pond. |
| Kneaded Eraser | Water shine: You can mold this eraser like clay. I pinch it into a sharp point to dab off pencil marks. It creates the bright white sparkles on the water. |
| Blending Stump | Smoothing out: I rub this over my rough pencil lines. It blends everything together so the water actually looks like liquid. |
How the Drawing Comes Together
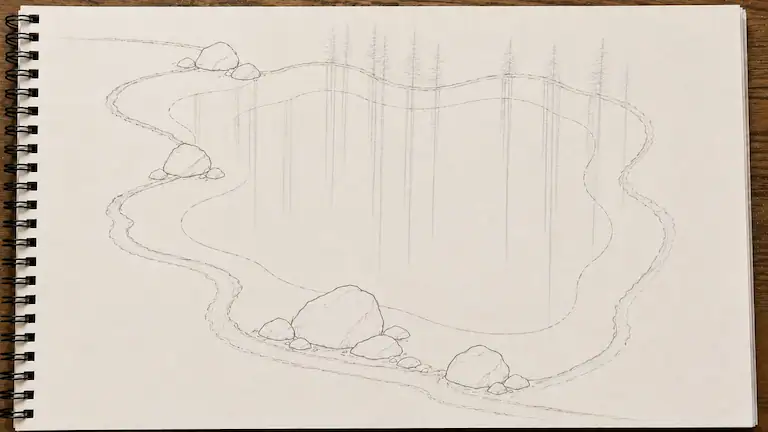
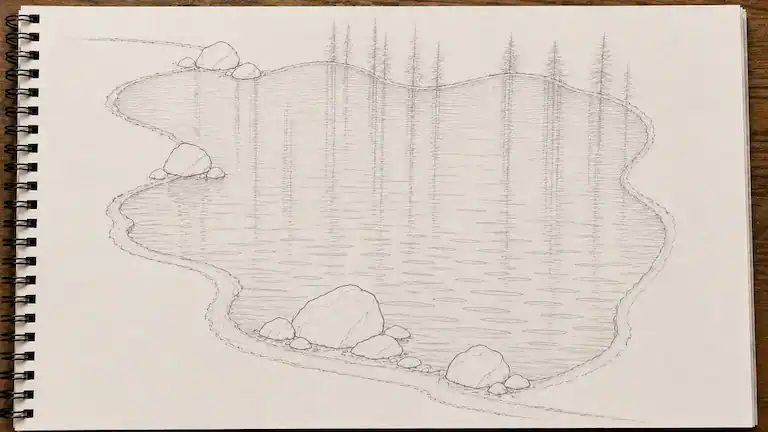
It is fun to watch a drawing change from start to finish. When I first start outlining, my sketch always looks like a messy jumble of lines. Don’t worry if yours looks rough at first. Here is how my drawing builds up step by step:
Caption: The finished drawing. Adding dark shadows and bright white eraser marks finally makes the water look wet.
Caption: The rough first sketch. It looks messy, but getting the basic shapes right is very important.
Caption: The halfway point. I rubbed the pencil lines to make the water smooth, but it still looks a bit flat.
Step-by-Step Visual Tutorial: Drawing a Pond
We need to build this drawing layer by layer. Grab your HB pencil to start outlining, and keep your 4B pencil close by for the dark shadows later. Let’s start drawing.
Step 1: Draw the Shoreline
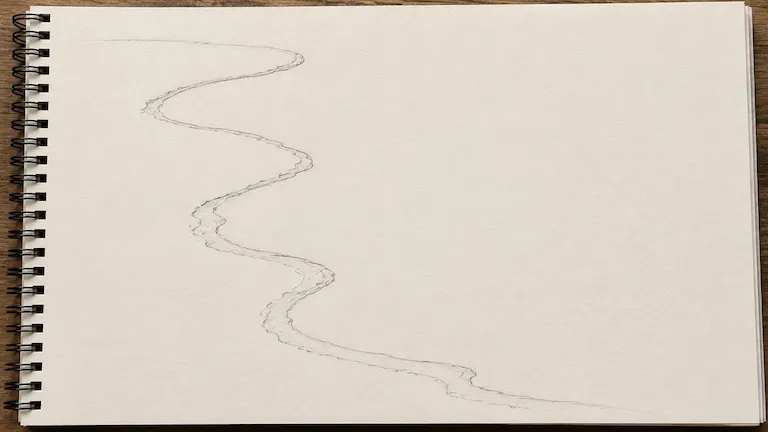
First, let’s draw the basic outline of the land. Use your HB pencil to draw a light, bumpy line where the dirt meets the water. Do not make this line perfectly straight. Nature is messy, so let the shoreline curve and wiggle a bit.
Step 2: Add Shoreline Rocks
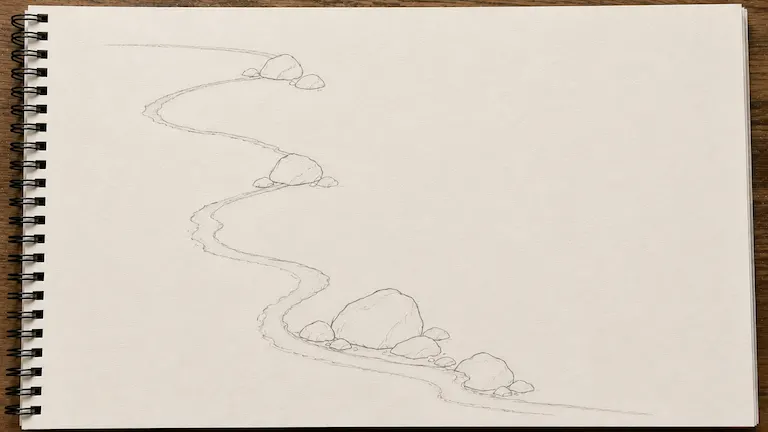
Next, put some rocks along the edge of the water. Draw them in groups. I like to draw one big rock first, and then put a few small pebbles around it. To make the rocks look heavy and stuck in the mud, draw the bottom edge a little flat.
Step 3: Sketch the Pond Shape
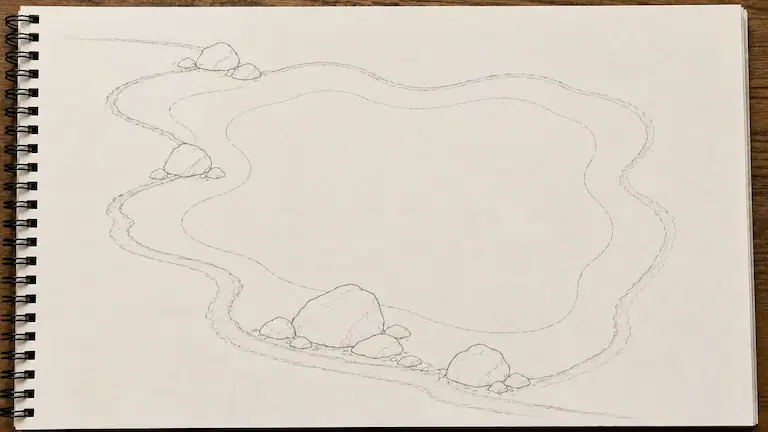
Lightly draw the outside edges of the water. Decide where the water is shallow, and where the deep center will be. Drawing this deep area now will help you later when it is time to shade.
Step 4: Draw the Reflections
Reflections can be tricky. There is one big rule for reflection drawing: always draw the reflection lines straight down on your paper. Do not slant them to match the curve of the land. If you slant the lines, the water will look like a slanted hill. This is a lot like tree drawing.
Step 5: Add Water Ripples
Ripples make the water look flat. You will use this trick a lot in river drawing and water drawing. Do not draw perfect circles. Instead, draw thin, flat ovals or broken dashes. Draw the ripples wider at the bottom of your page. As you go up toward the back of the pond, draw them smaller and closer together.
Step 6: Shade the Deep Water

The center of a real pond is usually very dark. Use your 4B pencil to heavily shade the deep middle area. Leave the water near the shore very light. Then, use your blending stump to rub the pencil marks until they are totally smooth. Make sure you cannot see any scratchy pencil lines.
Step 7: Final Details and Shine

Finally, draw some tall grass on the bank and a few lily pads in the water. Now for the best part: pinch your eraser into a sharp point and dab off tiny horizontal lines across the dark water. These bright white marks look like sunlight shining on the wet ripples.
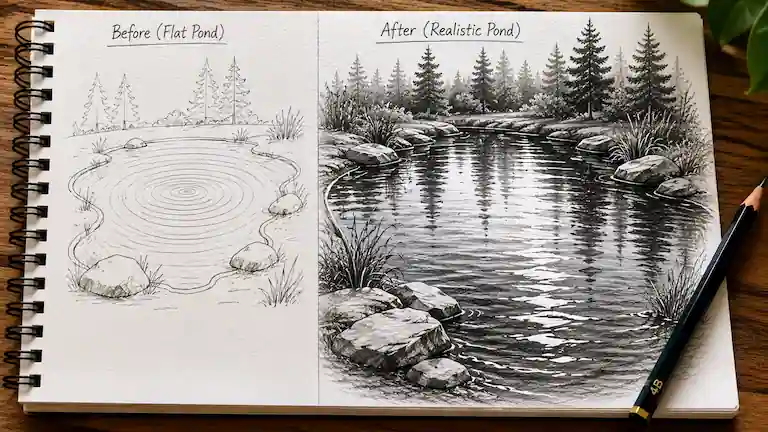
My Early Pond Drawings: Before and After
When I first started drawing landscapes, my ponds looked terrible. To be honest, my first try did not look like water at all. It looked like a flat, gray circle sitting on the grass. My rocks looked like round potatoes, and the edge of the water looked stiff and unnatural.
The “Before” Phase:
In my early drawings, my water looked like hard plastic. I shaded the whole pond with the exact same light color using my HB pencil. I left no white spaces on the paper, so the water did not shine. Without that bright shine, the water did not look wet.
It took me about 15 or 20 tries to finally figure out my mistakes. My biggest problem was being afraid of dark shadows. As a beginner, I was scared to use my dark 4B pencil. I only used safe, light gray colors. Because my shadows were too light, my bright white marks did not show up well.
Here is a quick look at how I improved with practice:
| Attempt | My Biggest Mistake | How I Fixed It |
| #1 | No reflections | The water looked like an empty hole. I learned that water must show the sky to look real. |
| #5 | Perfect circle ripples | The pond looked like a dartboard. I learned to draw flat, broken lines instead. |
| #10 | Weak, light shadows | The water had no depth. The whole drawing looked totally flat. |
| #15 | Floating lily pads | I drew green ovals with no shadows under them. They looked like floating UFOs instead of real plants. |
| #20 | The big change | I finally used my 4B pencil to make the deep water very dark. Then, I used my sharp eraser to make bright white spots. |
The “After” Phase (What Fixed Everything):
My drawings got much better when I stopped trying to draw water and started drawing light.
I was surprised to find that my best drawing tool was not a pencil, but my eraser. I finally used my dark 4B pencil to make the deep water very dark. Then, I used my sharp eraser to pull out bright white spots. Suddenly, the water looked real!
I also learned to cut a small “V” shape into my lily pads and draw a dark shadow right under them. This made them sit nicely on the water instead of floating above it. These simple changes made my flat sketch look like a real, living pond.
5 Tips for Looking at Real Ponds
Knowing the steps is great, but the real secret to drawing water is just watching how it acts in real life. Next time you go outside to sketch, look for these five things:
- The edges are see-through: Right where the water meets the dirt, the pond is usually clear. Don’t worry about drawing sky reflections there. Just draw the mud, tiny rocks, and weeds hiding right under the surface.
- Trees and reflections are one shape: Don’t draw a big tree on the bank and then try to add its reflection later. It is much easier to sketch them both at the same time. Treat the tree and its shadow in the water as one big, connected piece.
- Skip the bright blue pencil: Most beginners grab their brightest blue color first. But if you really look closely, pond water is mostly muddy green, brown, or a dull gray color coming from the sky.
- Wind breaks the mirror: On a quiet, still morning, water looks smooth like glass. But if it is windy outside, the breeze creates rough, choppy lines that break up all your nice reflections.
- Morning light is soft: Early morning light makes everything look soft and misty. But if you draw a pond at sunset, the shadows turn pitch black, and the sun makes bright, glowing white spots on the water.
Common Mistakes (With Picture Examples)
When a drawing looks fake, it is usually because of a few simple mistakes. Here is what you should try to avoid.
1. Perfect Circle Ripples
It is very easy to accidentally draw water ripples like a round target or a dartboard. But real moving water is messy. Real ripples break apart and cross over each other. Practice drawing flat, broken lines instead of perfect circles.
2. Slanted Reflections
Sometimes people draw shadows in the water slanting sideways to match the shape of the land. This is a big mistake! Because of how light works, reflections must always drop straight down on your paper.
3. Floating Lily Pads
If you just draw a plain oval for a lily pad, it will look like a flying saucer hovering above the pond. To make the plant look like it is resting on the water, press hard with your pencil and draw a very dark shadow right underneath it.
Pond Drawing Ideas and Styles
Once you learn the basic rules for drawing a pond, it is very easy to change your style and try new things. If you want to practice more landscape skills, you can explore our other drawing tutorials. Here are a few fun ways to draw a pond:
- Realistic Pond: Focus on drawing straight reflections and dark shadows. Use your eraser to make bright white spots so the water looks wet and detailed.
- Cartoon Pond: Keep all the shapes simple. Use thick dark lines, bright blue colors, and perfectly round lily pads for a fun, cartoon look.
- Pond Drawing for Kids: Keep it fun and easy. Use basic shapes and add cute things like a happy frog sitting on a lily pad, a swimming duck, and tall grass.
- Sunset Pond: Focus on dark and light colors. Draw the trees on the bank completely black, and leave the middle of the water bright white to show the setting sun.
- Koi Pond: Draw the pond as if you are looking straight down at it. Do not worry about drawing the sky. Instead, draw the bright fish and blurry rocks hiding under the water.
Frequently Asked Questions (FAQ)
How long does it take to draw a pond?
A simple pond drawing takes about 45 to 60 minutes. But if you want it to look very real with deep shadows and detailed reflections, it can take a few hours. Take your time when smoothing the pencil marks and making the bright spots. This is the most important part.
Can beginners draw a realistic pond?
Yes! Water might seem hard, but it is actually very forgiving. If you make a mistake on a ripple or shadow, it just looks like a natural wave. As long as you draw straight reflections and use a blending stump, even beginners can make great drawings.
How do you draw lily pads?
Start by drawing a flat oval. Next, cut out a small “V” shape on one side, like a Pac-Man mouth. The most important step is to draw a dark shadow right under the lily pad. This makes it look like it is resting on the water, not floating in the air.
How do you draw fish in a pond?
First, draw the basic shape of the fish. Then, gently rub the edges so they do not look too sharp. To make them look like they are underwater, lightly shade over the fish with your pencil. This pushes them below the surface.
How do you draw a pond with colored pencils?
You need to build the colors in layers. Start with light blues and greens. Use dark browns and dark blues for the shadows instead of black. At the very end, use a white pen or white paint to draw the bright, shining ripples on top.
What paper works best?
Do not use smooth printer paper. You need drawing paper with a little bit of texture. The rough paper holds the pencil marks better. This makes it much easier to draw rough rocks and smooth, deep water.
How do you create reflections?
The biggest rule for reflections is to always draw them straight down. Never slant them. Press a little lighter with your pencil than when you drew the real object. Use a slight wavy motion as you draw down to show the moving water.
How do you shade water?
Real-looking water needs to be very smooth. Use a blending stump or a piece of tissue to rub your pencil marks so you do not see any scratchy lines. Leave the water near the edge very light, and use a dark 4B pencil to make the deep middle part very dark.
How do you draw a simple pond?
Start by drawing a bumpy oval for the shore. Draw a few groups of circles around the edge for rocks. You don’t need to do any hard shading. Just draw some broken, flat lines inside the water for ripples. Finish by adding a few easy lily pads.
How do you draw realistic water?
To make water look real, use very dark shadows for the deep water and bright white spots for the shine. Pinch a kneaded eraser into a sharp point and dab it on the paper to make flat white lines. This looks like the sun shining on the water.
How do you fix a pond that looks flat?
If your pond looks flat, you probably need darker shadows. Make sure the deep center of your pond is much darker than the edges. Also, draw your ripples smaller and closer together as they go to the back of the drawing. This makes the pond look big and deep.
What pencil is best for water drawing?
It is best to use a few different pencils. Start with an HB pencil for your first outline. Next, grab a hard 2H pencil for tiny ripples far away so they do not smear. Finally, switch to a soft, dark 4B pencil to shade the deep water and the heavy shadows under the rocks.
About the Artist
Bijoy Pal is an artist, a digital marketer, and the creator of buzbusiness.com. He loves drawing landscapes and capturing the beautiful details of nature. Bijoy started this website to help beginners and intermediate artists learn the basic rules of drawing. By sharing his own art experience and giving easy, step-by-step guides, his goal is to make drawing simple. He wants to take away the confusion so anyone can learn to draw the world around them with confidence.