When you are looking for how to print double sided on Mac, you click print, and you want your document on both sides of the paper. You do not want to waste ink, and you definitely do not want to waste paper. You just want the printer to work.
But Apple often changes how its menus look. Depending on whether your Mac is new or old, the button to print on both sides might be in a completely different spot. Sometimes, the button is missing or you cannot click it at all.
Let’s fix this right now. Here is the newest guide to printing double-sided on any Mac, making it your normal setting, and fixing the hidden settings if your printer gives you trouble.
The Real Cost of Single-Sided Printing (The Data)
Before we look at the settings, let’s see why finding this button matters. It is not just about having a smaller stack of paper.
The Environmental Protection Agency (EPA) says a normal office worker uses about 10,000 sheets of paper every year. Printing on both sides cuts your paper use in half right away.
The Cost Savings Calculator:
1 pack of normal printer paper (500 sheets) costs about $6 to $8.
10,000 sheets is 20 packs, which costs $160 a year for one person.
The Double-Sided Savings: Printing on both sides saves you about $80 a year. In a small office with 10 people, that is $800 saved every year just on paper. While managing paper costs seems minor, ignoring small administrative overhead leaks like this is one of the classic operational startup mistakes to avoid when bootstrapping a lean budget. Plus, you need less space to store files and less money to ship them.
The Quick Fix (TL;DR)
If you are in a hurry and your printer can print on both sides by itself (called “duplex printing”), here is how to find the setting fast.
For New Macs (macOS Ventura, Sonoma, Sequoia): Press Command + P. Scroll down the menu on the right side until you see the Double-sided option. Click the switch to turn it On. Click Print.
For Older Macs (macOS Monterey and older): Press Command + P. Click the menu in the middle of the window (usually named Preview or Copies & Pages). Choose Layout. Check the Two-Sided box or choose Long-Edge binding. Click Print.
Did that work? Great! If you cannot find these buttons or you cannot click them, check the list below to jump right to your exact problem.
Step 1: Check if Your Printer Actually Supports Auto-Duplexing
Before you look for a missing button, let’s make sure your printer physically has the feature. Many users search for this setting only to realize their printer simply cannot do it.
Look at the model name on the front or back of your physical printer.
Does it have a “d” at the end? For example, HP LaserJet Pro M402dn or Brother HL-L2320D.
The “d” stands for Duplex. If you see a “d”, your printer supports automatic double-sided printing. If not, you will need to use the “Manual Flip” method further down this page.
How Major Printer Brands Handle Mac Setup
Sometimes, printers and Macs just don’t get along right out of the box. Each brand has its own weird quirks. Here is what normally goes wrong with double-sided printing for the top brands, along with the quickest way to fix it.
HP (Hewlett-Packard)
Common Problem: HP printers love to connect using Apple’s default “Secure AirPrint.” Sure, this makes setting up your Wi-Fi super fast, but it actually hides your double-sided settings.
The Fix: Remove the printer from your Mac’s System Settings. When you add it back, look for the “Use” menu at the bottom. Switch it from AirPrint to the actual HP software from their website.
Canon
Common Problem: You can see the Two-Sided box, but it is grayed out and you cannot click it. This just means your Mac hasn’t figured out that your printer can flip pages yet.
The Fix:Go to System Settings > Printers & Scanners. Click your Canon printer, pick Options & Supplies, and just check the box next to “Duplex Unit.”
Brother
Common Problem: If you connect over Wi-Fi, you might notice a bunch of layout settings are just gone—especially if you have a newer Mac.
The Fix: Brother actually runs a lot better if you use their own app. Grab the free Brother iPrint&Scan app from the Mac App Store. Open your file in there instead, and your double-sided options will come right back.
Epson
Common Duplex Problem: The Mac software for Epson printers will turn off the two-sided printing feature all by itself if you choose special kinds of paper (such as glossy photo paper or heavy cardstock) in your print menu.
The Fix: In the Mac print dialog, look for the Print Settings or Media Type dropdown. Ensure it is set strictly to “Plain Paper.” The Two-Sided option will instantly become clickable again.
Lexmark
Common Duplex Problem: The Lexmark print dialog shows a generic menu instead of Lexmark-specific binding options.
The Fix: Install the Lexmark Mac driver package. When pressing Command + P, click the central dropdown and look for the menu specifically titled “Lexmark Features.” You will find the duplex settings there.
Xerox
Common Duplex Problem: Accounting or Bi-directional communication fails on the Mac, locking the duplexer feature out of safety.
The Fix: Open the print window, go to Xerox Features, then click Advanced. Disable “Bi-Directional Communication.” You can now manually enable the Duplex setting.
Ricoh
Common Duplex Problem: Office network environments require a Job Log or User Code, which blocks the Mac from sending duplex commands.
The Fix: In the print menu dropdown, look for the “Job Log” tab. Enter your Ricoh user code there first, and the layout menu will unlock double-sided printing.
Kyocera
Common Duplex Problem: The custom Kyocera Print Panel does not show up on new macOS updates.
The Fix: Delete the printer. Re-add it using the “Generic PostScript Driver” (explained in the troubleshooting section below) or install the latest Kyocera Mac Phase driver from their official support site.
How to Print Double-Sided on macOS Ventura & Newer
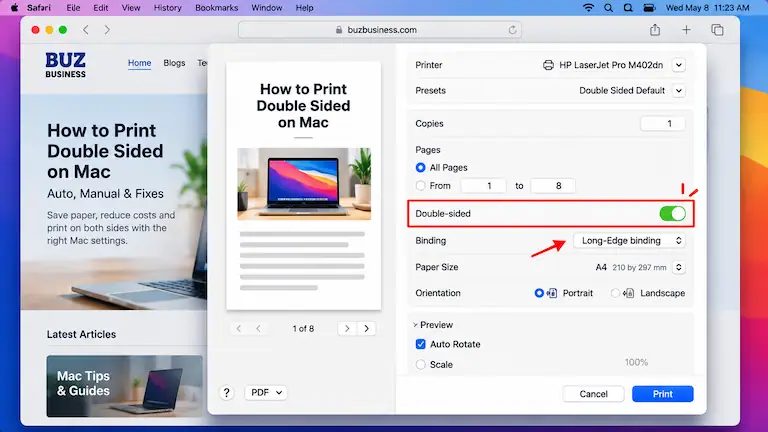
Starting with macOS Ventura (macOS 13) and continuing into Sonoma (macOS 14) and Sequoia (macOS 15), Apple completely redesigned the print menu. It is no longer a small box in the middle of your screen. It is now a long, scrolling sidebar on the right.
Here is exactly how to navigate it:
Open your document (like a PDF or a webpage).
Press Command + P on your keyboard.
Look at the new menu on the right side of your screen.
Scroll down past the “Copies” and “Pages” sections.
You will see a setting labeled Double-sided.
Click the toggle switch or the dropdown menu next to it and select On.
Click the blue Print button at the bottom.
Turning on double-sided printing in macOS Ventura and newer.
(Pro-Tip: If you are scrolling down the new sidebar and miss it, look right below the “Pages” section. A quick scroll reveals the toggle switch.)
What is Long-Edge vs. Short-Edge?
Sometimes, the menu asks you to choose how the paper binds.
Long-Edge: Choose this 95% of the time. This means the page flips like a normal reading book (portrait mode).
Short-Edge: Choose this only if you are printing a calendar or a wide document where you flip the pages over the top (landscape mode).
How to Print Double-Sided on macOS Monterey & Older
If you are using an older Mac (macOS 12 Monterey, Big Sur, Catalina, or older), you still have the classic Apple print window. This window hides the extra settings inside a dropdown menu.
Here is how to find it:
Locating the double-sided print option on macOS Monterey and older.
Press Command + P to open the print window.
Look for a simple checkbox that says Two-Sided next to the “Copies” number. If you see it, check it and click Print!
If you do not see the checkbox, look for a thick bar in the middle of the window. It usually says Preview or Copies & Pages.
Click that bar to open a dropdown menu.
Select Layout from the list.
Find the Two-Sided option and change it to Long-Edge binding.
Click Print.
How to Set Double-Sided Printing as the Default
Once you learn how to print double sided on Mac, one of the most common complaints is having to turn the setting on every single time you print a document. You can force your Mac to remember this setting forever by creating a “Preset.”
A Preset is simply a saved group of settings. Here is how to make double-sided printing your default:
Press Command + P to open the print menu.
Turn on the Double-sided setting using the steps we just covered above.
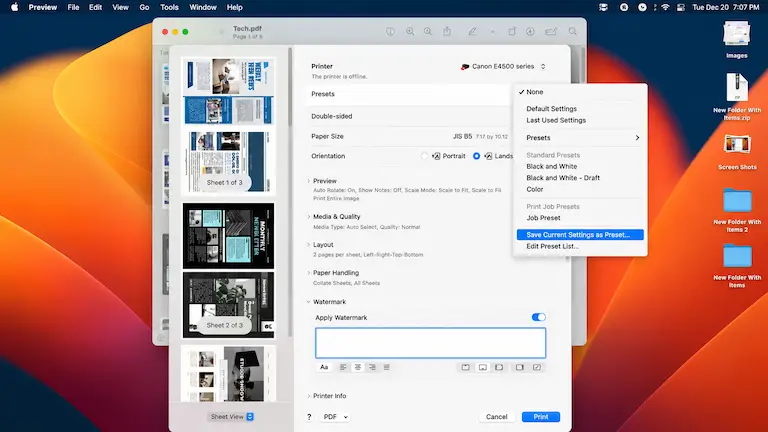
Once the setting is turned on, look for the Presets dropdown menu (usually near the top, right under your printer’s name).
Click the Presets menu and select Save Current Settings as Preset…
A small box will pop up. Type a name you will remember, like “Double Sided Default” or “Save Paper.”
Click OK or Save.
Saving double-sided printing as a default preset on Mac.
Now, every time you print, your Mac will automatically select this “Double Sided Default” profile, and you will never have to dig for the setting again.
The Manual Flip (If Your Printer Only Prints on One Side)
What if you have a cheaper printer that cannot print on both sides by itself? Your Mac knows this, so it hides the “Two-Sided” button.
You can still print on both sides, but you have to flip the paper yourself. Don’t worry, it is easy if you follow the right steps.
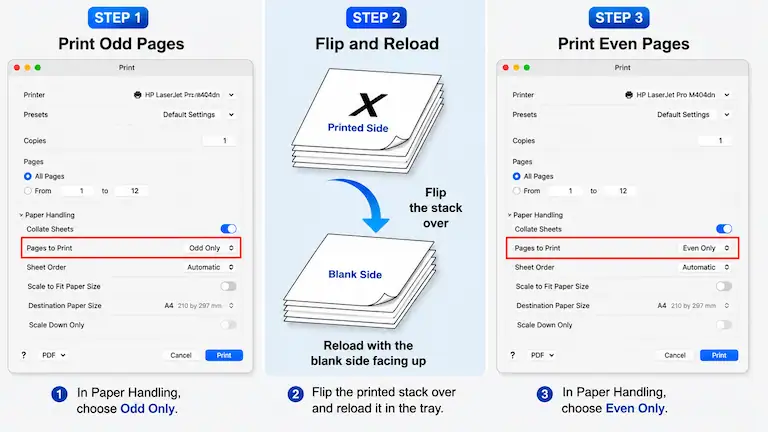
Step-by-step manual flip printing guide.
1. Select Odd Pages Only (Print the first side)
Press Command + P.
Scroll down to (or choose from the menu) the Paper Handling section.
Look for the setting called Sheets to Print or Pages to Print.
Change this from “All Pages” to Odd Only.
Click Print and wait for the pages to finish printing.
2. Flip and Reload the Paper (Test your paper tray first)
Take your printed pages and put them back into the paper tray.
Important Tip: Every printer pulls paper differently. Take a blank sheet, draw a big “X” on the top side, and print a test page. See if the ink prints on the same side as the X or on the blank back.
Once you figure out how your printer works, put your printed pages back in so the blank sides are ready for ink.
3. Select Even Pages Only (Print the second side)
Go back to your document and press Command + P again.
Go back to the Paper Handling menu.
Change the setting to Even Only.
Click Print. Your document will now print perfectly on the blank back of your pages.
Why the Print Menus Change in Different Apps
Sometimes, the app you are using ignores Apple’s normal layout and uses its own menu. If you print from Google Chrome or Microsoft Word, the steps change a little bit.
Here is a quick guide to finding the double-sided button in popular apps:
App You Are Using
Where to Find the Double-Sided Button
Apple Safari / Preview
Scroll down to the Double-sided switch (New Macs) OR check the Layout menu (Old Macs).
Microsoft Word
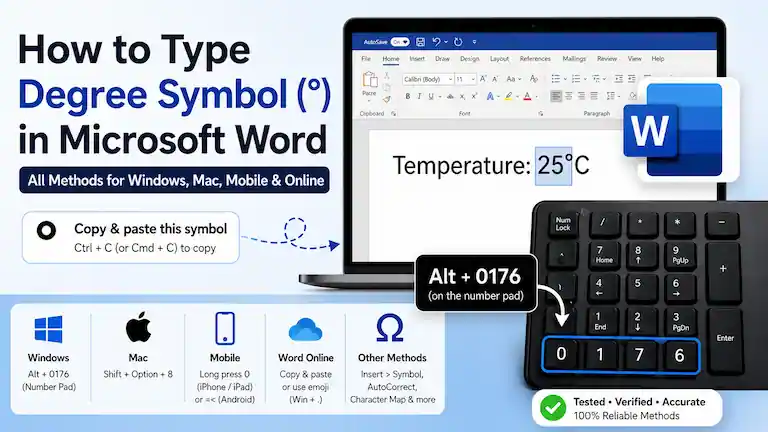
Click the Copies & Pages menu, choose Layout, and check the Two-Sided box. If you are currently formatting technical notes or weather reports before printing, you can also check out our quick guide on how to insert a degree symbol in Word to fix your text layout first.
Google Chrome
Click Print using system dialog (or press Command + Option + P) at the bottom of the Chrome menu. This opens up the hidden Mac settings. This step is incredibly common when you need to output hard copies of long-form reports or drafts generated by the best AI tools for SEO content writing.
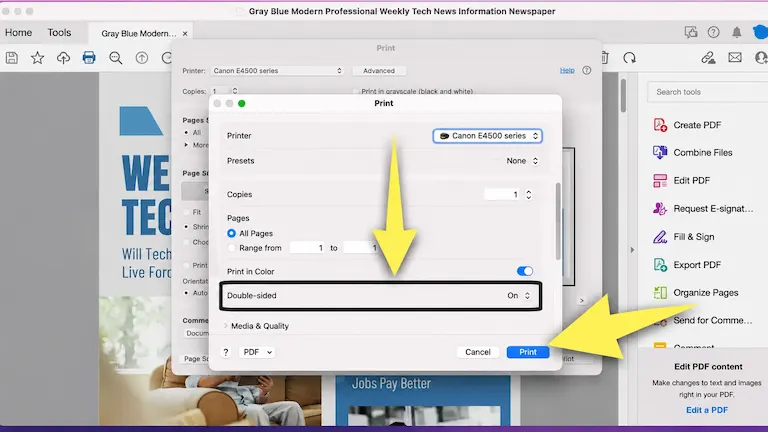
Adobe Acrobat (PDF)
Look right under “Page Sizing & Handling” on the main screen and check the box that says Print on both sides of paper.
Microsoft Excel & Apple Numbers
Spreadsheets print a little differently. Many people have a hard time printing them on both sides because the menu looks completely different. In Excel, pressing Command + P opens Excel’s own special print menu.
Scroll down to the Margins / Page Setup section.
Click Page Setup… at the bottom.
Click the Options… button to open the normal Mac print menu.
Now, choose Layout and check the Two-Sided box.
Troubleshooting: Why is the “Two-Sided” Button Grayed Out?
You already know how to print double sided on Mac in theory, and you just did it the other day. But today, the button is grayed out and you cannot click it.
This happens because the software that talks to your printer got confused and turned the feature off. Here is how to force it back on.
Fix 1: Turn on the Duplex Unit in System Settings
We just need to remind your Mac that your printer has this hardware built in.
Click the Apple Logo in the top left corner of your screen.
Choose System Settings (or System Preferences).
Scroll down the left menu and click on Printers & Scanners.
Click on your printer’s name in the list.
Click the Options & Supplies button.
Go to the Options tab.
Look for a checkbox labeled Duplex Unit (or Double-Sided Printing). Check that box and click OK.
Go back to your document and try to print again. The button should work perfectly now!
Fix 2: Delete and Add the Printer Again (The AirPrint Fix)
If you do not see that checkbox, your Mac is probably using basic, generic software instead of the official software for your exact printer.
Go back to Printers & Scanners.
Click your printer, then click the Remove Printer button (or the minus “-” sign at the bottom).
Once the printer is gone, click Add Printer (or the plus “+” sign).
Choose your printer from the list.
Important Tip: When you pick your printer, look at the “Use” menu at the bottom. Your Mac might pick “Secure AirPrint” by default. AirPrint is great for phones, but it hides settings like double-sided printing. Change this from AirPrint to your actual printer name (like HP Envy or Epson WorkForce).
Click Add.
Your Mac will now download the right software, and your double-sided option will come back.
Fix 3: Force It Using a Hidden Menu (Advanced)
Sometimes the Mac completely locks the printer software, and normal settings just will not work. You have to use a hidden web menu to force it to print on both sides. (If you enjoy learning these types of advanced system workarounds, check out our full AI & Technology category). Here is how:
Mac Terminal Command:
sudo cupsctl WebInterface=yes
Open the Terminal app on your Mac (you can search for it in Spotlight).
Paste the command you copied above and press Enter. (This turns on the hidden menu).
Open your web browser (like Safari or Chrome) and go to http://localhost:631.
Click the Printers tab at the top and click your printer.
Click the Administration menu and choose Set Default Options.
Find the Duplex or Two-Sided option.
Set it to Long-Edge and click save.
Weird Mac Printing Bugs (and How to Fix Them)
Sometimes, the basic fixes just do not work. If your Mac is still being stubborn, try these extra tricks that solve rare bugs.
1. The “TextEdit Override” (For Microsoft Word)
Many Mac users with older software notice that Microsoft Word completely hides the two-sided printing button, even if the printer can do it.
The Fix: Open the TextEdit app (the simple typing app that comes with your Mac). Open a blank page and press Command + P. Check the “Two-Sided” box, but do not print—just click Cancel. Go back to Microsoft Word and try to print again. Turning this on in TextEdit forces Microsoft Word to wake up and see your printer’s true features.
2. The “Browser vs. Preview” PDF Trap
Are you trying to print a shipping label or a ticket right from a web page in Chrome or Safari? Web browsers often hide the double-sided button for PDFs.
The Fix: Do not print PDFs from your web browser. Download the PDF to your Mac’s Downloads folder. Double-click the file to open it in Apple Preview (the normal Mac app for reading PDFs). Press Command + P. Apple Preview will almost always show the hidden double-sided button.
3. The Secret Printer Website Fix
Sometimes your Mac is totally fine, but the printer’s own internal brain is turning off the double-sided feature.
The Fix: Find your printer’s IP address (look in the Wi-Fi or network settings on the printer’s little screen; it looks like a number, such as 192.168.1.5). Type that exact number directly into your Mac’s web browser and hit Enter. This opens your printer’s secret website. Go to Printer Settings, find Advanced, and turn the Duplex (or Two-Sided) setting to On. Save your changes.
4. The Old Office Printer Workaround
If you are at an office using a shared network printer (like an older HP LaserJet), Apple’s normal setup will often take away features like double-sided printing.
The Fix: When you delete and add the printer again in your Mac’s System Settings (like we did in Fix 2 above), click the Use menu. Instead of picking your exact printer brand, click Select Software, and choose Generic PostScript Printer. This older software forces the Mac to let you use the double-sided feature on stubborn office printers.
Frequently Asked Questions
Why is the two-sided printing option missing on my Mac?
If the button is completely gone, your Mac probably connected to your printer using “Secure AirPrint.” This hides extra features. Go to System Settings > Printers & Scanners, delete the printer, and add it again. Make sure to change the “Use” menu from AirPrint to your exact printer name.
Does AirPrint support double-sided printing?
Normal AirPrint works fine for basic double-sided printing on most new printers. But, it often hides extra settings. If your printer can print on both sides but AirPrint will not let you do it, you need to download the official software from the company that made your printer.
Why is my Mac printing upside down on the second page?
This happens because the binding setting is wrong. If your pages are flipping upside down like a wall calendar, you picked “Short-Edge binding.” To fix this, change your setting to “Long-Edge binding” so it flips like a normal reading book.
Can I print double-sided if my printer only prints on one side?
Yes, but you have to do it by hand. Print all the “Odd Pages” first using the Paper Handling menu. Then, physically flip the paper stack over, put it back into your printer, and print all the “Even Pages.”
How do I print double-sided from a web browser?
If you are using Safari, the double-sided button is right there in the normal Mac print menu. If you are using Chrome or Microsoft Edge, look at the bottom of the print menu and click “Print using system dialog” to open the hidden Mac settings.